-->

Wednesday 6 April 2016

SharePoint Navigation was never this easy

Over the few years as the SharePoint has evolved, so as its navigation. With SharePoint 2007 it started with the simple navigation links on the left side. It evolved a bit in SharePoint 2010, with the top menu bar along with the Navigation links on the right hand side. It allowed us to customize the stylesheet with SharePoint 2013 display templates. But Navigation from end users view has never been evolved. It still takes so many clicks for the user to reach out to his documents. I recently came across wonderful google chrome extension for SharePoint Navigation - ‘Fly view for SharePoint’ available which will allow us to seamlessly navigate through your site structure in flash of seconds. 


Works with Office 365 or SharePoint Site seamlessly, All you need is google chrome. If you are looking for a server version, stay tuned over here  going to be launched soon!


Let’s have a quick glance on what Fly view for SharePoint is capable of doing

Navigate to multiple subsites from the root site


If we have a multiple subsites managed as single repository for all the countries, you can view out directly from the fly view extension. You can even view what document libraries, lists, Images and so on from the root site of the navigation bar. And of all that you don’t have to click even once, all this is done by just a hover of the mouse!

Preview and download your files without actually navigating to that document


You can actually preview your files directly from the navigation bar and save it directly to your desktop. It can preview all the supported formats for the SharePoint Preview feature. 


View/Edit Metadata of the documents on the Fly 


With each document or the content you can view or edit the metadata properties directly using the Preview feature of the SharePoint.


Mark Favourites for what’s dear to you


Often we have frequently visited document libraries/folder or the documents in SharePoint. You can mark that as favourites or find out from your History List!

All you just have to do is mark the Star button and Fly View will remember it for you in the Favourites List.


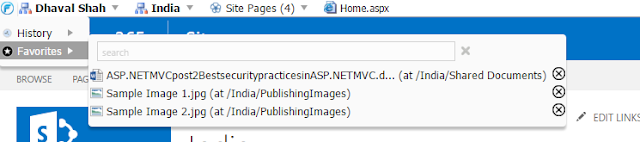
Here are my favourite links or documents,


It even tracks your history for all dates!

Fly View is more than the features

  • Navigation is lightning fast! It can easily navigate through the multiple subsites in milliseconds! 
  • You can easily plug and play the extension from the google chrome.
  • Imagine the number of hours you can save with the use of this extension. 

Did you know? 

This Product has been under development by Developers at Aurora Bits  for around 2 years just to make it right. Developers definitely deserves a kudos for their hard work and dedication.

It can always be better!

This has been so far my best product or app for the SharePoint but there are some enhancements which I look forward to
Similar App for the other browsers especially Microsoft Edge or Internet Explorer
Good to have a quick view of the List Data and schema
Ability to Customize the look and feel of the fly view as per branding of the site

Do you have any more suggestions? Please feel free to comment and let us know!


Tuesday 15 September 2015

Get Data in JQuery DataTable from SharePoint List using $skip, $top, $inlinecount, $orderby parameters

In this article we will show how you can load the data from SharePoint List using REST API into JQuery DataTable using the Ajax Pagination.

In my previous article I showed you how to retrieve the data from the SharePoint list using REST API but it retrieves all the data from the list at once which is good for the list having less number of items/records but what if the list has large number of items as SharePoint client object model supports retrieval of 5000 items at once. 

In this case the SharePoint REST API provides the $TOP, $ORDERBY, $SKIP AND $INLINECOUNT parameters to retrieve only the records required to show on one page.

Parameter
Example
Description
$skip
$skip=n
Returns entries skipping the first n entries, according to the $orderby parameter
$top
$top=n
Returns only the top n entries, according to the $orderby and $skip parameters
$inlinecount
$inlinecount=allpages
It will add the  __count property to the results which indicates the total number of entries which match the $filter expression 
$orderby
$orderby = CustomerName
Returns the records ordered by the CustomerName field

Example: http://server/siteurl/_vti_bin/listdata.svc/Customers?$ $select=Id,CustomerName,Address,HomePhone,MobileNumber,Email,Organization,RolesValue &$inlinecount=allpages&skip=2&$top=2

We will use these parameters to retrieve the data required and bind it to our JSON

We will use the same customers list we used in my previous article series
I have created the CustomerJqueryDataTableAjax.js and CustomerJqueryDatatableAjax.txt for this article, which you can download it at the end of this post.

The rest query to get the top 10 items from the customers list would look like this,

../_vti_bin/listdata.svc/Customers?$select=Id,CustomerName,Address,HomePhone,MobileNumber,Email,Organization,RolesValue&$inlinecount=allpages&$top=10

Now in order to support pagination in DataTable the json results should have values of “sEcho”, “iTotalRecords”, “iTotalDisplayRecords in the json results which is not provided by the SharePoint by default so we will manipulate it in the fnServerData function of the JQuery DataTable.

Monday 14 September 2015

Free Text Search on Column in JQuery Datatable


In my previous article I showed you how to retrieve the data from the SharePoint list using REST api and bind it to the JQuery Datatable. And In another article I showed how you can perform a column filter using the dropdown. Jquery DataTable provides a free text search but it is for the entire table this article will help you implement the free text search on the particular column.

Articles on the Jquery DataTable and SharePoint REST API

In this article we will show how you can perform a free text search on the custom column particularly on the JQuery DataTable which retrieved the data from the SharePoint List using the REST Api.

We will use the same customers list we used in my previous article and perform a free text search on the Address column.


Custom DropDown Column Filter in JQuery Datatable


In this article we will show how you can add the custom column filters on the JQuery DataTable which retrieved the data from the SharePoint List using the REST Api.

In my previous article I showed you how to retrieve the data from the SharePoint list using REST api and bind it to the JQuery Datatable.


Articles on the Jquery DataTable and SharePoint REST API 

We will use the same customers list we used in my previous article except that we will add two more columns to it viz, ‘Organization’ and ‘Role’. I have assigned some data to these columns for the existing records.


Make sure you add the organization and Role column in the js file to be retrieved from the SharePoint.
 tableContent += '<td>' + objArray[i].Organization + '</td>';  
 tableContent += '<td>' + objArray[i].RolesValue + '</td>';  
Let’s pick up our CustomerJqueryDatatable.txt and add the panel to hold our dropdowns for organization and roles column. You can place this code above our CustomerPanel div.
 <div id="filterPnl">  
   <table style="width:100%">  
     <tr>  
       <td style="width:50%;">Organization : <span id="orgDropDown"></span></td>  
       <td style="width:50%;">Roles : <span id="roleDropdown"></span></td>  
     </tr>  
   </table>  
 </div>  
 </br /><hr /> </br />  

CustomerJqueryDatatable.txt should look something like this now.
 <script type="text/javascript" src="../SiteAssets/js/jquery-1.11.0.min.js"></script>  
 <script type="text/javascript" src="https://cdn.datatables.net/1.10.9/js/jquery.dataTables.min.js"></script>  
 <link href="https://cdn.datatables.net/1.10.9/css/jquery.dataTables.min.css" rel="Stylesheet" type="text/css" />  
 <script type="text/javascript" src="../SiteAssets/CustomerJqueryDatatable.js"></script>  
 <div id="filterPnl">  
   <table style="width:100%">  
     <tr>  
       <td style="width:50%;">Organization : <span id="orgDropDown"></span></td>  
       <td style="width:50%;">Roles : <span id="roleDropdown"></span></td>  
     </tr>  
   </table>  
 </div>  
 </br /><hr /> </br />  
 <div id="CustomerPanel">  
   <table style="width: 100%;">  
     <tr>  
       <td>  
         <div id="CustomerGrid" style="width: 100%"></div>  
       </td>  
     </tr>  
   </table>  
 </div>  

Open the CustomerJqueryDatatable.js file in SharePoint Designer. Now here we will use the initComplete function and this.api().columns(column index)of the JQuery DataTable to get the column values for the organization and roles to bind it to our dropdown.

Friday 4 September 2015

Load the Data in JQuery DataTable from SharePoint List using REST API


In this article I will show how you can retrieve the data from the SharePoint List using the REST Api and bind it to the JQuery DataTable.

JQuery DataTable is an excellent plugin tool built on JQuery JavaScript library to build an HTML table with lot of advanced interaction controls like pagination, sorting, searching, etc. 

You can download the js file for the data table from here

Articles on the Jquery DataTable and SharePoint REST API 

For the purpose of the demo, I have created a customer list with the below columns and loaded it with some dummy data.

Customer SharePoint List

First of all we will create 2 files viz CustomerJqueryDatatable.js and CustomerJqueryDatatable.txt files and place it under the Site Assets Library. Also make sure you add the jquery js file in your SiteAssets/js folder.

Add the content editor web part on your page and give the path of the CustomerJqueryDatatable.txt file from the Site Assets Library and Save/Publish the Page.

Open the CustomerJqueryDatatable.txt file in SharePoint Designer and add the reference to the “jquery-1.11.0.min.js”, “jquery.dataTables.min.js” ,”jquery.dataTables.min.cs” and “CustomerJqueryDatatable.js” file in the CustomerJqueryDatatable.txt file.

 <script type="text/javascript" src="../SiteAssets/js/jquery-1.11.0.min.js"></script>  
 <script type="text/javascript" src="https://cdn.datatables.net/1.10.9/js/jquery.dataTables.min.js"></script>  
 <link href="https://cdn.datatables.net/1.10.9/css/jquery.dataTables.min.css" rel="Stylesheet" type="text/css" />  
 <script type="text/javascript" src="../SiteAssets/CustomerJqueryDatatable.js"></script>  

Wednesday 2 September 2015

Query User Profile Service for Multiple Users in SharePoint Using SPServices


Lot of people are using the SPServices these days. SPServices is a jQuery library which encapsulates SharePoint Web Services with jQuery to make it easy to call them.

In this post, I will show how to query the user profile service from the SharePoint (2010/2013/Office 365) using the SPServices. As it will retrieve the properties of multiple users and there is no batch query possible in SharePoint to retrieve the properties of all users in one shot, we will leverage the async and cache property of the SPServices to query properties of multiple users.

Before we begin let’s make sure that SPServices is loaded correctly and SPServices JS files are loaded.

Download the jquery.SPServices-0.6.2.min.js file from here and reference in the code as below. I will suggest to upload it in the Site Assets Library.

 <script type="text/javascript" language="javascript" src="../SiteAssets/jquery-1.6.1.min.js"></script>  
 <script type="text/javascript" language="javascript" src="../SiteAssets/jquery.SPServices-0.6.2.min.js"></script>  
 <script type="text/javascript" language="javascript">  
  $(document).ready(function() {  
   alert("jQuery Loaded");  
   alert($().SPServices.SPGetCurrentSite());  
  });  
 </script>  

If we get both the alerts that means our Jquery and SPservices javascript files are loaded and we can move further.
Now to begin with for the demo purpose we will retrieve the users stored in the SharePoint group and we will display the user profile properties from that user list.
We will store the usernames of all the users in the ‘usersList’ array and push their login name in it.
 var userDivPnl;  
 var usersList = [];  
 $().SPServices({  
   operation: "GetUserCollectionFromGroup",  
   groupName: 'Members Group',  
   async: false,  
   completefunc: function(xml, Status) {  
     $(xml.responseXML).SPFilterNode("User").each(function() {  
       var name = $(this).attr("Name").toUpperCase();  
       var accountname = $(this).attr("LoginName");  
       usersList.push(accountname);  
       //Replacing the special characters from the loginname  
       var login = accountname.split("|")[2].replace("@", "_").replaceAll(".", "");  
       //Generate the HTML Div structure to add users properties in each div  
       userDivPnl += '<div>' +  
         '<div > ' +  
         '<div class="profile_photo" style="width: 100px;"> ' +  
         '     <img height="96" width="96" id="profile_' + login + '" src="' + noProfileImg + '" style="border-radius: 100%;"/> ' +  
         '</div> ' +  
         '&nbsp;&nbsp; ' +  
         '<div > ' +  
         '<p id="dispname_' + login + '"></p> ' +  
         '<p id="jobtitle_' + login + '"></p> ' +  
         '<p id="country_' + login + '"></p> ' +  
         '<p id="contact_' + login + '"><a href="#"></a></p> ' +  
         '<p><a id="email_' + login + '"></a></p> ' +  
         '</div> ' +  
         '</div> ' +  
         '</div> ';  
     });  
     userDivPnl += '</div>';  
     $("#container").append(userDivPnl);  
   }  
 });  

Thursday 20 August 2015

Display the Calendar Using Jquery Full Calendar and SharePoint Rest API


In this post I will show you how to create your own Jquery Calendar view using the simple Jquery and SharePoint Rest API. I have used the Jquery full calendar plugin as it is very easy to use. It is highly customizable and very light weight.

I have created a Calendar list in my site and named it as ‘UpcomingEvents’. We will use this list to store our events or meetings.

You will required to add the reference to the following files from FullCalendar.io 


 <link href="../SiteAssets/css/fullcalendar.css" rel="stylesheet"/>  
 <link href="../SiteAssets/css/fullcalendar.print.css" rel="stylesheet" media='print' />  
 <script type="text/javascript" src="../SiteAssets/js/jquery-1.11.0.min.js" ></script>  
 <script type="text/javascript" src="../SiteAssets/js/fullcalendar.min.js" ></script>  
 <script type="text/javascript" src="../SiteAssets/JqueryFullCalendar.js" ></script>  

Create JqueryFullCalendar.txt and add the above mentioned references in the file,

JqueryFullCalendar.txt


 <link href="../SiteAssets/css/fullcalendar.css" rel="stylesheet"/>  
 <link href="../SiteAssets/css/fullcalendar.print.css" rel="stylesheet" media='print' />  
 <script type="text/javascript" src="../SiteAssets/js/jquery-1.11.0.min.js" ></script>  
 <script type="text/javascript" src="../SiteAssets/js/moment.min.js" ></script>  
 <script type="text/javascript" src="../SiteAssets/js/fullcalendar.min.js" ></script>  
 <script type="text/javascript" src="../SiteAssets/JqueryFullCalendar.js" ></script>  
           <div id='calendar' class="float:left search-results"></div>  

Thursday 13 August 2015

Issues of Console.Log with Internet Explorer


Recently, I ran into an issue with one of my client where my particular callback function of ajax call was not called at all. It worked absolutely fine with google chrome and it was only issue with the Internet Explorer.

I did lot of digging around the ajax calls using fiddler to see if there is problem in the ajax call or whether some JavaScript file is not loaded correctly but could not find it much on that front.

I could track the issue when we open the IE development toolbar and it used to work absolutely fine. Initially I could not produce it  on my machine as I frequently use the IE toolbar. After troubleshooting a bit i found out that console object is exposed only when the developer tools are opened for a particular tab. If I do not open the developer tools window for that tab, the console object remains exposed for each page you navigate to. If I open a new tab, I must also open the developer tools for that tab in order for the console object to be exposed.

This was some petty issue which took lot of time to identify for me. So for workaround on this I  developed a small utility file for logging into console which will work across all the browsers.
This utility will log console messages only when console object is active else it will skip logging.

 /*
 FileName  :  DPSUTILS.js
 Author   :  Dhaval Shah
 Description :  This Javascript library contains common methods to do the read/Write operation across  
         different data sources e.g. UserProfile, Managed Metadata Service and Search Service
 */
 (function() {
   if (!window["DPS"]) {
     window["DPS"] = {};
   }
   DPS.Namespace = {
     Register: function(namespace) {
       var parts,
         context,
         nsPath,
         partsLength;
       parts = namespace.split(".");
       partsLength = parts.length;
       context = window;
       nsPath = "";
       for (var i = 0, l = partsLength; i < l; ++i) {
         var name = parts[i];
         if (!context[name]) {
           context[name] = {};
           context[name].__namespace = name;
         }
         nsPath += name + ".";
         context = context[name];
         if (!context.__namespace) {
           context.__namespace = nsPath.substring(0, nsPath.length - 1);
         }
       }
       return context;
     }
   };
 })();
 /**
  * This namespace contains utility functions used across application.
  */
 (function() {
   DPS.Namespace.Register("DPS");
   DPS.Namespace.Register("DPS.UTILS");
      DPS.UTILS = {    
     /*
      * Logs the exception message in browser console
      * @param {string} message - Exception Message
      */
     logAjaxErrorMessage: function(xhr, status, error) {
         if (xhr.responseText != "") {
           var message = xhr.responseText;
           if (typeof console === "undefined") {
             return;
           }
           console.error(message);
         }
       },
       logMessage: function(message) {                
           if (typeof console === "undefined") {
             return;
           }
           console.log(message);        
       }
   };
 })();

Save this file as DPSUTILS.js and reference it in your code.

In order to log message you can directly use

DPS.UTILS.logMessage("My Log Message . . .");


I hope this was helpful..

Happy Coding !

Wednesday 4 December 2013

SharePoint Multi-Language Variation Site


We will use the SharePoint Online variations feature to create multi-language site.
There will be a source site (most probably in English) where most of the authoring and creation of content will take place and there will be another target site (in your native language) which will be created with the help of 'Machine Translation Service'.
In the above figure it can be seen that we will first create a variation site in English and there will be target site in Hindi which will be auto generated from English.
First to begin please make sure we have following things in place,
  • Activate SharePoint Server Publishing Infrastructure feature on the ‘Root Site’ collection
  • ‘Root site’ is of type ‘Publishing Site’(in my case, http://sp2013labapp01/sites/demo )
  • Language Pack Hindi should be installed on all the Servers in SharePoint Farm

At the end of this article we will have 2 links,
  • Source Site in English: http://sp2013labapp01/sites/demo/en-us
  • Target Site In Hindi : http://sp2013labapp01/sites/demo/hi-in


Configure Variation Settings for your ‘Root Site’

In this step we will configure which and what things to create variation for.
  1. Go to Site Settings of your ‘Root Site’
  2. Click on ‘Variation Settings’
  3. Make sure the variation settings are as shown in the screenshot below
  4. These are the default settings and easy to go for this tutorial. Click on ‘OK’

Creating and Configuring Machine Translation Service in SharePoint 2013


To Use the Machine Translation service to create the multi-language feature of SharePoint 2013 we need to first make the ‘Machine Translation Service’ up and running in your farm.

So this article will outline on creating and configuring the machine translation service for SharePoint and in the next article I will outline the steps to create a multi-language site.

Creating Machine Translation Service

Open Central Administration, go to Application Management section, and choose Manage service applications.

On the ribbon, choose New, and then choose Machine Translation Service.


On the next page type a name for the service application and fill in the details as shown in the screens below


Thursday 28 November 2013

Query Rules in SharePoint 2013


With the help of Query Rules in Sharepoint 2013 without any custom code we can promote a specific result or even change the ranked result by changing the query. Search Expert or the Search Manager of the organization has the freedom and power to change the search experience and adapt it to the organization needs. Defining the right keywords to be matched on the user queries and mapping the conditions with the relevant actions is easy but the process must undoubtedly be well managed. The management of the query rules should definitely be part of your SharePoint 2013 search governance strategy.

A query rule can specify the following three types of actions:
  • Add Promoted Results
  • Add one or more groups of results, called result blocks.
  • Change the ranking of results.

How to Add Query Rule:
Let’s take a scenario where organization is maintaining the list of glossary terms managed in the organization. When we search in google “meaning of activity”, it automatically recognizes that user wants to know the meaning of the word ‘activity’ and it highlights its meaning at top and displays the rest of the results in bottom.


SharePoint also provides this feature using ‘Query Rule’ feature.

SharePoint Crawls - Full, Incremental, Continuous


Full Crawl

Full Crawl of Content source will re index all the content from beginning

Important Points to Consider:
  • If new managed property has been introduced, we need to run Full Crawl of content source     
  • If new crawl rules are created/updated/deleted, Full crawl of content source is required
  • If incremental crawl has been failed
  • If software update or service pack has been installed on the servers
  • Expensive in terms of performance issues


Incremental Crawl

Incremental Crawl of Content source will only process those items which are changed since the last crawl happened.

Important Points to Consider:
  • Most preferred after the full crawl has been done.
  • Does not hamper the performance as it will crawl only modified documents not the entire content source.
  • The incremental crawl will retry items and postpone crawling the item if the error persists.


A limitation with the Full Crawl and Incremental Crawl is we cannot schedule both to execute parallel. For example if the Full Crawl is already running then the Incremental Crawl cannot be triggered until the Full Crawl completes, if you try to Stop Full Crawl then also it is mandatory to finish at least once successful Full crawl before triggering any Incremental Crawls.

So Microsoft has come up with the concept of Continuous Crawl

Continuous Crawl

With Continuous Crawl you can maintain the content index as fresh as possible.               
    More than one continuous crawl can run in parallel
    one deep change will not result in degraded freshness on all following changes

The impact of a "Continuous Crawl" is the same as an incremental crawl.

At the parallel execution of crawls, the "Continuous Crawl" within the parameters defined in the "Crawler Impact Rule" which controls the maximum number of requests that can be executed by the server (default 8).

The Subscription Settings service and corresponding application and proxy needs to be running in order to make changes to these settings

I see the following error when I tried to configure my App Url


Execute the following commands


Get-SPManagedAccount contoso\sp_services
$appPool = New-SPServiceApplicationPool -Name SubscriptionServiceAppPool -Account $account
$serviceApp = New-SPSubscriptionSettingsServiceApplication -ApplicationPool $appPool -name "Subscription Settings Service Application" -DatabaseName "SP2013AppSubscriptionSettingsDB"
$serviceAppProxy = New-SPSubscriptionSettingsServiceApplicationProxy -ServiceApplication $serviceApp


Make sure the below services are started


Perform an iisreset

Configure DNS

Create a forward lookup zone for the app domain name

1.       Verify that the user account that performs this procedure is a local administrator on the domain controller.
2.       Click Start, point to Administrative Tools, and then click DNS.
3.       In DNS Manager, right-click Forward Lookup Zones, and then click New Zone….
4.       In the New Zone Wizard, click Next.
5.       In the Zone Type page, accept the default of Primary zone, and then click Next.
6.       In the Active Directory Zone Replication Scope page, select the appropriate replication method for your environment (the default is To all DNS servers in this domain), and then click Next.
7.       In the Zone Name page, in the Zone name box type the name for your new app domain name (for example, ContosoApps.com), and then click Next.
The New Zone Wizard shows the new domain name for apps.

1.       On the Dynamic Update page, select the appropriate type of dynamic updates for your environment (the default is Do not allow dynamic updates), and then clickNext.
2.       On the Completing the New Zone Wizard page, review the settings, and then click Finish.